
After a little delay, here is the 4th offering by Chandos in his "build your own app" series. Hope this is helpful to all the adventurous tech-savvy-developer types! You can go to Chandos' blog to see all four posts together http://chandos-shv.blogspot.com/
BTW, our new SHV app is almost complete and it looks awesome! Can't wait to show you...
Guest blogger Chandos
Blog Entry 4
Whoops! Six weeks without an update! I'm sure you're all waiting with baited breath.
Apologies!
As I said last time, I've only done all of this iPhone coding business by the grace of God. To finish my God and Google story....
God taught me some important things about myself. Like I said before, I tend to rely on me and my thoughts, hopes, rationale, and sometimes luck to get me through issues. And not every issue, but ones where I sometimes forget that God can still be involved. Like technology. I tend to forget that God is absolute, and present everywhere...why wouldn't/couldn't He help me with tech stuff.
While I searched and searched for an answer, I got more and more frustrated. And I kid you not...in a pathetic moment of desperation, I said...fine God...You're going to have to help me find this answer.
No less than 2 minutes later, I found a video tutorial on YouTube that fit exactly what I need.
God showed up...and all I did was ask.
Can God influence my Googling? It sure seems like it. While there may have not been some magical rearranging of results, or a page created out of thin air, He used the gifts He's already given me, along with a heaping of guidance, to lead me where I needed to go.
I say it was a "pathetic moment" only because why didn't I ask God for help in the first place!?!?!?!? I've got to ditch the "Look-at-what-I-did" attitude, and turn it into a "Look-at-what-God-did-and-let-me-help-with" attitude. What amazing things would God do in this world if we all did that!?
All in all, it was a great reminder that I serve a brilliant God. Who never seems to mind humbling me.
Now, for the rest of this post, let's follow up with what I promised.
The Deep End.....
Scary stuff, especially if you don't know how to swim in the Objective C. Ha, a programming pun.
Terrible, I know, but true.
When I started this project, I knew next to nothing about coding. Now, I know slightly more, but still not enough to be considered a programmer proper.
As far as swimming in the deep end, I'll teach you to doggie paddle, or maybe just how to float on your back.
If we pick up where we left off, we looked at what the code looks like in Xcode. To save you some worries and headache right of the bat, learn to overlook the green text.

Now don't get me wrong. I don't mean ignore it, just overlook it.
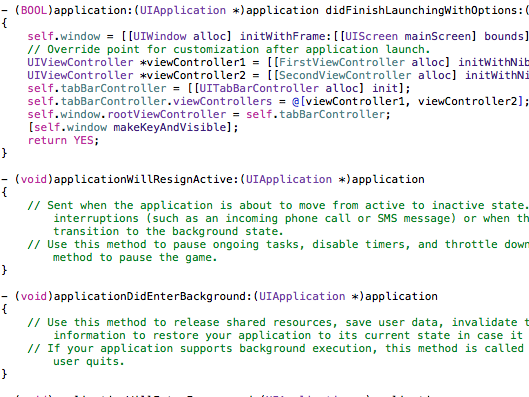
Xcode is smart. Smarter than me when it comes to coding. The green merely indicates that Apple, or another developer, has left you some notes. By including "//" on any line, you start a comment. This can be extremely helpful for remembering what you did, especially if you don't know what the code really says. In the SHV app, I left myself several notes so as to not get lost in my own document.
Phew, one color down, more to go, which I'll knock out in a list.
Pink - more or less the command taking place
Purple - the name of something, somewhere
Slightly different green from the comments - another type of naming color
Red - something in quotations that is not considered part of the code
Black - other text
Brown - the import section of your files
Quite the list, and I'm sure I'm missing a few others, but that should be a good start. And I'm probably not entirely technically correct, but hey, I'm not a coding expert. And I'm hoping that I put stuff in lay terms that are easy enough to understand.
Enough with colors, right?
Let's talk about what makes up an iOS app.
Basically, you have three types of files in every app. You have a .h file, a .m file, and a .xib file.
The .h file is your header file. "Why do I need a header file?" you ask...
The header file can be used as a reusable file. For example, in the SHV app, I needed to get some information from an XML file. (An XML file is the type of file used for a podcast or sometimes a blog) So I created a header file that can be referenced by any of my other files. That way, if the SHV app were to incorporate multiple podcasts, I wouldn't have to have multiple header files. I just have the one, that could be referenced multiple times. For a more detailed look, read BORING, check out http://en.wikipedia.org/wiki/Header_file.
Confused yet? Good...'cause so was I. :)
The .m file is your implementation file. The implementation file is where the majority of the code goes. Same as before...for more reading, check out http://en.wikipedia.org/wiki/Implementation_file.
The .xib file, or sometimes referred to as a nib file, is my favorite part. To me, it's the easiest to understand. It's your interface file. Meaning, it's how your app, or that particular page of your app, will look. If you think of an iPhone app like a website, the .xib file is what the website actually looks like and the .h and .m files are the code running the whole thing. You can find out more about .xib files here: http://en.wikipedia.org/wiki/Nib_file.
Xcode does a fantastic job with the .xib files. For example:

This is what your .xib file looks like, based on the template we used last time. Neat! It looks just like an iPhone screen.

This is what is essentially your artist's palette, or what objects you can put on your .xib.
If you want to get crazy, drag a few objects over to the .xib window. See what happens. Next time, we'll look at setting things up to match your previously designed app.
And I won't make it 6 weeks till then....promise!
Whoops! Six weeks without an update! I'm sure you're all waiting with baited breath.
Apologies!
As I said last time, I've only done all of this iPhone coding business by the grace of God. To finish my God and Google story....
God taught me some important things about myself. Like I said before, I tend to rely on me and my thoughts, hopes, rationale, and sometimes luck to get me through issues. And not every issue, but ones where I sometimes forget that God can still be involved. Like technology. I tend to forget that God is absolute, and present everywhere...why wouldn't/couldn't He help me with tech stuff.
While I searched and searched for an answer, I got more and more frustrated. And I kid you not...in a pathetic moment of desperation, I said...fine God...You're going to have to help me find this answer.
No less than 2 minutes later, I found a video tutorial on YouTube that fit exactly what I need.
God showed up...and all I did was ask.
Can God influence my Googling? It sure seems like it. While there may have not been some magical rearranging of results, or a page created out of thin air, He used the gifts He's already given me, along with a heaping of guidance, to lead me where I needed to go.
I say it was a "pathetic moment" only because why didn't I ask God for help in the first place!?!?!?!? I've got to ditch the "Look-at-what-I-did" attitude, and turn it into a "Look-at-what-God-did-and-let-me-help-with" attitude. What amazing things would God do in this world if we all did that!?
All in all, it was a great reminder that I serve a brilliant God. Who never seems to mind humbling me.
Now, for the rest of this post, let's follow up with what I promised.
The Deep End.....
Scary stuff, especially if you don't know how to swim in the Objective C. Ha, a programming pun.
Terrible, I know, but true.
When I started this project, I knew next to nothing about coding. Now, I know slightly more, but still not enough to be considered a programmer proper.
As far as swimming in the deep end, I'll teach you to doggie paddle, or maybe just how to float on your back.
If we pick up where we left off, we looked at what the code looks like in Xcode. To save you some worries and headache right of the bat, learn to overlook the green text.
Now don't get me wrong. I don't mean ignore it, just overlook it.
Xcode is smart. Smarter than me when it comes to coding. The green merely indicates that Apple, or another developer, has left you some notes. By including "//" on any line, you start a comment. This can be extremely helpful for remembering what you did, especially if you don't know what the code really says. In the SHV app, I left myself several notes so as to not get lost in my own document.
Phew, one color down, more to go, which I'll knock out in a list.
Pink - more or less the command taking place
Purple - the name of something, somewhere
Slightly different green from the comments - another type of naming color
Red - something in quotations that is not considered part of the code
Black - other text
Brown - the import section of your files
Quite the list, and I'm sure I'm missing a few others, but that should be a good start. And I'm probably not entirely technically correct, but hey, I'm not a coding expert. And I'm hoping that I put stuff in lay terms that are easy enough to understand.
Enough with colors, right?
Let's talk about what makes up an iOS app.
Basically, you have three types of files in every app. You have a .h file, a .m file, and a .xib file.
The .h file is your header file. "Why do I need a header file?" you ask...
The header file can be used as a reusable file. For example, in the SHV app, I needed to get some information from an XML file. (An XML file is the type of file used for a podcast or sometimes a blog) So I created a header file that can be referenced by any of my other files. That way, if the SHV app were to incorporate multiple podcasts, I wouldn't have to have multiple header files. I just have the one, that could be referenced multiple times. For a more detailed look, read BORING, check out http://en.wikipedia.org/wiki/Header_file.
Confused yet? Good...'cause so was I. :)
The .m file is your implementation file. The implementation file is where the majority of the code goes. Same as before...for more reading, check out http://en.wikipedia.org/wiki/Implementation_file.
The .xib file, or sometimes referred to as a nib file, is my favorite part. To me, it's the easiest to understand. It's your interface file. Meaning, it's how your app, or that particular page of your app, will look. If you think of an iPhone app like a website, the .xib file is what the website actually looks like and the .h and .m files are the code running the whole thing. You can find out more about .xib files here: http://en.wikipedia.org/wiki/Nib_file.
Xcode does a fantastic job with the .xib files. For example:

This is what your .xib file looks like, based on the template we used last time. Neat! It looks just like an iPhone screen.

This is what is essentially your artist's palette, or what objects you can put on your .xib.
If you want to get crazy, drag a few objects over to the .xib window. See what happens. Next time, we'll look at setting things up to match your previously designed app.
And I won't make it 6 weeks till then....promise!
0 comments:
Post a Comment